Crazyflie 2.0
Jump to navigation
Jump to search
About
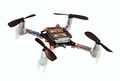
Crazyflie 2.0

The Crazyflie 2.0 is nice little open source quadcopter. Yes it runs Paparazzi to. It is a Work In Progress, together we get there. Expect it soon to apear in Paparazzi master. We first need some testflights,indeed.
Features
- Easy to assemble and no soldering required
- WIP: Wireless firmware updates
- On-board charging via standard uUSB
- Dual-MCU architecture with dedicated radio/power management SoC for advanced applications
- All the Real-time logging, graphing and variable setting as one is used to with Paparazzi
Specifications
- Weight: 27g
- Size: 92x92x29mm
- Radio: BL 20 dBm nRF5182
- Bluetooth LE support
Microcontrollers
- STM32F405 main application MCU (Cortex-M4, 168MHz, 192kb SRAM, 1Mb flash)
- nRF51822 radio and power management MCU (Cortex-M0, 32Mhz, 16kb SRAM, 128kb flash)
- uUSB connector
- On-board LiPo charger
- Full speed USB device interface
- 8KB EEPROM
IMU
- 3 axis gyro (MPU-9250)
- 3 axis accelerometer (MPU-9250)
- 3 axis magnetometer (MPU-9250)
- WIP high precision pressure sensor (LPS25H)
Flight specifications
- Maximum payload weight: ~10 g
Motors
There are four 7x16mm Coreless DC-motors icw default props that give a maximum take-off weight of ~40g
Mechanical specification
- Diameter: 7.0 mm
- Length: 16.0 mm
- Shaft length: 3.5 mm
- Shaft diameter: 0.8 mm
- Weight: 2.7 g
- Wire length: 32.0 mm
Electrical specification
- Kv: 14 000 rpm/V
- Rated voltage: 4.2 V
- Rated current: 1000mA
Expansion connectors
- VCC (3.0V, max 100mA)
- GND
- VCOM (unregulated VBAT or VUSB, max 1A)
- VUSB (both for input and output)
- I2C (400kHz)
- SPI
- 2 x UART
- 4 x GPIO/CS for SPI
- 1-wire bus for expansion identification
- 2 x GPIO connected to nRF51
Airframe
Flashing
Flashing via DFU
Howto set the Crazyflie in the DFU update mode:
- Connect the USB cable to your Crazyflie 2.0 but not to your PC just yet...
- Unplug the Crazyflie 2.0 battery if it is plugged in
- Keep pressing the on/off button while inserting the USB cable in your PC
- Hold down the button for about 5 seconds until if starts to blink faster second blink rate (1Hz), then release the on/off button
- The Crazyflie 2.0 can now receive your new firmware... Click "Upload" in Paparazzi Cente
Flashing via BlackMagicProbe
For this you need a BMP and a 10 pin adaptor board.
Over Air
- WIP...
Debugging
With e.g. great BlackMagicProbe JTAG adapter development can be smoother than without.
Extra
Add GNSS
A light GPS
Wifi
One can add one of thos small ESP based Wifi modules described here