Difference between revisions of "Sensors/GPS"
AutumnLeaves (talk | contribs) |
|||
| (16 intermediate revisions by 4 users not shown) | |||
| Line 59: | Line 59: | ||
[[Image:U-blox_color_warm_60.gif|100px]] | [[Image:U-blox_color_warm_60.gif|100px]] | ||
[http://www.u-blox.com uBlox is a Swiss technology company] | [http://www.u-blox.com uBlox is a Swiss technology company] that develops very good positioning modules. They are the recommended GPS modules for use with Paparazzi autopilots. Note that u-Blox produces the modules only. They do not sell complete boards to end users. These are sold by a multitude of vendors. | ||
Why uBlox: | Why uBlox: | ||
*Low cost [[Sensors/GPS#u-blox_NEO-6M|NEO6-M]]) | *Low cost ([[Sensors/GPS#u-blox_NEO-6M|i.e. NEO6-M]]) | ||
*Small size | *Small size | ||
*Excellent performance | *Excellent performance (u-Blox 7 and 8 series) | ||
*Up to 10Hz update rate | *Up to 10Hz update rate | ||
*5V tolerant UART | *5V tolerant UART | ||
*Works out of the box with Paparazzi's u-Blox [[Module/GPS_UBlox_UCenter|auto-configuration module]] | |||
The '''[[Tiny]]''' series features an onboard LEA series GPS receiver and patch antenna, while most other boards boards require an external receiver+antenna such as the [[#Paparazzi_Stand-alone_GPS_Receivers|Paparazzi GPS]] or [[#u-Blox_SAM-LS_GPS_Smart_Antenna|SAM-LS]] | The '''[[Tiny]]''' series features an onboard LEA series GPS receiver and patch antenna, while most other boards boards require an external receiver+antenna such as the [[#Paparazzi_Stand-alone_GPS_Receivers|Paparazzi GPS]] or [[#u-Blox_SAM-LS_GPS_Smart_Antenna|SAM-LS]]. | ||
{|align = center | {|align = center | ||
| Line 78: | Line 78: | ||
|} | |} | ||
'''Note:''' The proprietary UBX protocol is used as it offers more information and efficiency than the universal NMEA protocol. | '''Note:''' The proprietary UBX protocol is used as it offers more information and efficiency than the universal NMEA protocol. For details take a look at the code in <tt>sw/airborne/subsystems/gps/gps_ubx.c</tt>. | ||
==u-Blox LEA Series Receivers== | ==u-Blox LEA Series Receivers== | ||
| Line 84: | Line 84: | ||
<!-- [[Image:Lea big.jpg|200px|thumb|right|u-blox LEA]] --> | <!-- [[Image:Lea big.jpg|200px|thumb|right|u-blox LEA]] --> | ||
[[Image:Lea5htiny13.jpg|thumb|left|200px|LEA-5H installed on the Tiny]] | [[Image:Lea5htiny13.jpg|thumb|left|200px|LEA-5H installed on the Tiny]] | ||
The '''[[Lisa]]''' series, '''[[Twog_v1|TWOG]]''', '''[[Classix]]''' and '''[[Previous_Autopilots|AVR-based]]''' boards require an external GPS module and antenna. The '''[[Tiny]]''' features an integrated receiver and antenna. Either type is designed for [http://www.u-blox.com/ u-blox] 4, 5 and 6 series GPS receivers and the proprietary UBX binary protocol. An external battery or capacitor is typically used to enable the GPS to retain data while powered off for significantly faster signal re- | The '''[[Lisa]]''' series, '''[[Twog_v1|TWOG]]''', '''[[Classix]]''' and '''[[Previous_Autopilots|AVR-based]]''' boards require an external GPS module and antenna. The '''[[Tiny]]''' features an integrated receiver and antenna. Either type is designed for [http://www.u-blox.com/ u-blox] 4, 5 and 6 series GPS receivers and the proprietary UBX binary protocol. An external battery or capacitor is typically used to enable the GPS to retain data while powered off for significantly faster signal re-acquisition. Any of the LEA-4, LEA-5 and LEA-6 series receivers can be used including the less expensive LEA-4A, 4S, 5A and 5S and similar low cost 6-series models as the special boot configuration code required for these models is already written as a [[Module/GPS_UBlox_UCenter|module]]. | ||
<source lang="xml"> | <source lang="xml"> | ||
| Line 104: | Line 104: | ||
Image:Ppzgps13_lrg_02.jpg|Bottom | Image:Ppzgps13_lrg_02.jpg|Bottom | ||
</gallery> | </gallery> | ||
<p>Paparazzi source provides a design for an external GPS board. An external GPS board is required for Lisa, TWOG and Classix | <p>Paparazzi source provides a design for an external GPS board. An external GPS board is required for other boards like Lisa, TWOG, Elle0 and Classix. | ||
Programming it is similar to the Tiny2.11 GPS configuration. If you build your own you will want to upload the latest u-blox firmware before you configure. See [[Get Hardware]] for sources of assembled boards.</p> | Programming it is similar to the Tiny2.11 GPS configuration. If you build your own you will want to upload the latest u-blox firmware before you configure. See [[Get Hardware]] for sources of assembled boards.</p> | ||
<p> | <p> | ||
| Line 165: | Line 165: | ||
This is the cheapest GPS module with antenna for ~13€ at [http://www.hobbyking.com/hobbyking/store/__31135__NEO_6M_GPS_Module.html Hobbyking]. | This is the cheapest GPS module with antenna for ~13€ at [http://www.hobbyking.com/hobbyking/store/__31135__NEO_6M_GPS_Module.html Hobbyking]. | ||
They come with different (sized) patch antenna, mounted on a | They come with different (sized) patch antenna, mounted on a separate PCB. The main PCB and antenna PCB are fixed with hot glue together and can be separated by hand. | ||
<br style="clear:both;"/> | <br style="clear:both;"/> | ||
| Line 179: | Line 179: | ||
See [http://www.ublox.com/en/evaluation-tools-a-software/reference-designs/for-gps-chips/c04-6h.html http://www.ublox.com/en/evaluation-tools-a-software/reference-designs/for-gps-chips/c04-6h.html] for more info. | See [http://www.ublox.com/en/evaluation-tools-a-software/reference-designs/for-gps-chips/c04-6h.html http://www.ublox.com/en/evaluation-tools-a-software/reference-designs/for-gps-chips/c04-6h.html] for more info. | ||
<br style="clear:both;" /> | <br style="clear:both;" /> | ||
==Drotek Boards== | |||
[http://www.drotek.com Drotek's] u-Blox GPS boards work well and are not expensive. | |||
==uBlox GPS configuration== | ==uBlox GPS configuration== | ||
=== | ===Using uBlox U-Center=== | ||
''Note: Before attempting manual configuration consider | ''Note: Before attempting manual configuration consider adding the [[Module/GPS_UBlox_UCenter|u-blox UCenter module]] to your airframe instead. If automatic configuration does not work for you please make an issue in he gitgub issue tracker or report it to the mailing list or the Gitter chat and may attempt the manual procedure below. But be aware that a wrong configuration can cause Paparazzi not acquiring any GPS lock for sometimes hard to find reasons.'' | ||
[[Image: | [[Image:Ucenter_on_linux_using_wine_v2.png|thumb|u-center configuration software]] | ||
[ | [https://www.u-blox.com/en/product/u-center-windows U-Center] is an application intended for the configuration of u-Blox receivers. | ||
* [ | * [https://www.u-blox.com/sites/default/files/u-centersetup_v8.27.zip Download u-center directly] | ||
TIP: If you want to direct access to the GPS module without unplugging from your autopilot board you can [[tunnel|upload the UART tunnel firmware]] to your AP board. | |||
====Installation on Linux==== | |||
Using the latest u-Center v8.27 is needed if you want to setup the uBlox GNSS receivers of the 8 series and use all setting available. We could use u-Center perfectly with Ubuntu 16.04 and the latest version of Wine v2.0.2. | |||
Cut and paste this one-liner in you terminal to install just that: | |||
<nowiki> | |||
sudo dpkg --add-architecture i386 && \ | |||
sudo apt-add-repository 'https://dl.winehq.org/wine-builds/ubuntu/' && \ | |||
wget https://dl.winehq.org/wine-builds/Release.key && \ | |||
sudo apt-key add Release.key && \ | |||
sudo apt update && \ | |||
sudo apt install winehq-stable | |||
mkdir -p ~/.wine/dosdevices &&\ | |||
ln -s /dev/ttyUSB0 ~/.wine/dosdevices/COM1 && \ | |||
ln -s /dev/ttyUSB0 ~/.wine/dosdevices/com1 && \ | |||
ln -s /dev/ttyUSB1 ~/.wine/dosdevices/COM2 && \ | |||
ln -s /dev/ttyUSB1 ~/.wine/dosdevices/com2 | |||
</nowiki> | |||
NOTE | |||
''Depending on your connection method and your udev configuration your serial device may have a different path. Just look it up using <code>dmesg</code> or <code>tail -f /var/log/syslog</code> after plugging in.'' | ''Depending on your connection method and your udev configuration your serial device may have a different path. Just look it up using <code>dmesg</code> or <code>tail -f /var/log/syslog</code> after plugging in.'' | ||
Start U-center and choose your com port from the pull down list under the connect button near the top left corner of the window. Choose your baudrate from the pull down box to the right of the connect button or select the auto-baud button to the right of that. U-blox default is 9600 baud. This must be set to 57600 or higher to accommodate a 10Hz update rate. It needs to match whatever your module is configured with. | |||
<br>[[Image:Ucenter_choose_baudrate.png|connect, baud, and autobaud buttons]] | |||
Start U-center and choose your com port from the pull down list under the connect button near the top left corner of the window. Choose your baudrate from the pull down box to the right of the connect button or select the auto-baud button to the right of that. | |||
<br>[[Image: | |||
<br style="clear:both"> | <br style="clear:both"> | ||
| Line 221: | Line 228: | ||
* [[Media:Tiny_LEA-5H-v5.zip|LEA-5H (For Use w/ Firmware V5 ONLY!)]] | * [[Media:Tiny_LEA-5H-v5.zip|LEA-5H (For Use w/ Firmware V5 ONLY!)]] | ||
* [[Media:Hk_NEO-6M.zip| Hobbyking NEO-6M]] [http://www.hobbyking.com/hobbyking/store/__31135__neo_6m_gps_module.html this module] | * [[Media:Hk_NEO-6M.zip| Hobbyking NEO-6M]] [http://www.hobbyking.com/hobbyking/store/__31135__neo_6m_gps_module.html this module] | ||
* [[Media:Drotek_NEO_M8_38400.txt.zip |Drotek NEO-M8 at Baud 38400]] | |||
===Automatic Configuration at Startup=== | ===Automatic Configuration at Startup=== | ||
| Line 250: | Line 258: | ||
# Change the baudrate of U-Center to 38400bps if the connection is lost at this point | # Change the baudrate of U-Center to 38400bps if the connection is lost at this point | ||
# UBX->CFG->RATE(Rates) - change the '''Measurement Period''' to '''250ms''' This gives a 4 Hz position update since 4 x 250ms is one second. | # UBX->CFG->RATE(Rates) - change the '''Measurement Period''' to '''250ms''' This gives a 4 Hz position update since 4 x 250ms is one second. | ||
# UBX->CFG->SBAS : '''Disable''' (SBAS appears to cause occasional severe altitude | # UBX->CFG->SBAS : '''Disable''' (SBAS appears to cause occasional severe altitude calculation errors) | ||
# UBX->NAV (not UBX->CFG->NAV): double click on '''POSLLH, SOL, STATUS, SVINFO, VELNED.''' They should change from grey to black | # UBX->NAV (not UBX->CFG->NAV): double click on '''POSLLH, SOL, STATUS, SVINFO, VELNED.''' They should change from grey to black | ||
# UBX->CFG->CFG : '''save current config''', click '''"send"''' in the lower left corner to permanently save these settings to the receiver | # UBX->CFG->CFG : '''save current config''', click '''"send"''' in the lower left corner to permanently save these settings to the receiver | ||
| Line 271: | Line 279: | ||
# Change the baudrate of U-Center to 38400bps if the connection is lost at this point | # Change the baudrate of U-Center to 38400bps if the connection is lost at this point | ||
# UBX->CFG->RATE(Rates) - change the '''Measurement Period''' to '''250ms''' This gives a 4 Hz position update since 4 x 250ms is one second. | # UBX->CFG->RATE(Rates) - change the '''Measurement Period''' to '''250ms''' This gives a 4 Hz position update since 4 x 250ms is one second. | ||
# UBX->CFG->SBAS : '''Disable''' (SBAS appears to cause occasional severe altitude | # UBX->CFG->SBAS : '''Disable''' (SBAS appears to cause occasional severe altitude calculation errors) | ||
# UBX->NAV (not UBX->CFG->NAV): double click on '''POSLLH, SOL, STATUS, SVINFO, VELNED.''' They should change from grey to black | # UBX->NAV (not UBX->CFG->NAV): double click on '''POSLLH, SOL, STATUS, SVINFO, VELNED.''' They should change from grey to black | ||
# UBX->CFG->CFG : '''save current config''', click '''"send"''' in the lower left corner to permanently save these settings to the receiver.<p> Make sure you activate '''"2 - I2C-EEPROM"''' if using a ROM-based NEO chipset with external EEPROM (like [http://www.hobbyking.com/hobbyking/store/__31135__neo_6m_gps_module.html HK 31135])</p> | # UBX->CFG->CFG : '''save current config''', click '''"send"''' in the lower left corner to permanently save these settings to the receiver.<p> Make sure you activate '''"2 - I2C-EEPROM"''' if using a ROM-based NEO chipset with external EEPROM (like [http://www.hobbyking.com/hobbyking/store/__31135__neo_6m_gps_module.html HK 31135])</p> | ||
| Line 279: | Line 287: | ||
* To backup the configuration to a file on your PC: under the tools menu, choose GPS configuration, then click GPS>>file. This file can be re-loaded in a similar manner to configure additional identical receivers. Be sure the box 'Store configuration into BBR/Flash' is checked when reloading a configuration file to make the changes permanent. | * To backup the configuration to a file on your PC: under the tools menu, choose GPS configuration, then click GPS>>file. This file can be re-loaded in a similar manner to configure additional identical receivers. Be sure the box 'Store configuration into BBR/Flash' is checked when reloading a configuration file to make the changes permanent. | ||
* To update the firmware on a LEA-6H get u-center >= 6.21, revert the GPS receiver to the default configuration, get an appropriate firmaware file from u-Blox, find the flash identification flash.txt file in the u-center install directory and be prepared to wait a long time.(seriously) | * To update the firmware on a LEA-6H get u-center >= 6.21, revert the GPS receiver to the default configuration, get an appropriate firmaware file from u-Blox, find the flash identification flash.txt file in the u-center install directory and be prepared to wait a long time.(seriously) | ||
====NEO-M8==== | |||
* UBX - CFG - PRT: disable NMEA output (only UBX protocol) | |||
{|align = center | |||
|- | |||
[[Image:u-center-prt.png|thumb|left|U-Center-PRT]] | |||
|} | |||
<br style="clear:both;" /> | |||
* UBX - CFG - MSG: activate PVT, SOL, SVINFO messages for UART1 | |||
{|align = center | |||
|- | |||
[[Image:u-center-msg.png|thumb|left|U-Center-MSG]] | |||
|} | |||
<br style="clear:both;" /> | |||
==uBlox Tips== | ==uBlox Tips== | ||
| Line 296: | Line 320: | ||
The default used by the [[Module/GPS_UBlox_UCenter|u-blox UCenter module]] keeps SBAS enabled. | The default used by the [[Module/GPS_UBlox_UCenter|u-blox UCenter module]] keeps SBAS enabled. | ||
===Assist Now=== | |||
u-Blox modules that have a flash memory can keep the almanac correction data for up to 35 days into the future. That will give you a 3d GPS fix within seconds. [https://www.u-blox.com/en/assistnow-lock-your-position-instantly AssitNow] Offline data can be uploaded to the module while it is connected to the u-center application. To use this feature you need to provide a u-Blox account credentials that you can receive from the [https://www.u-blox.com/en/assistnow-service-registration-form u-Blox registration site]. | |||
===Antenna options for the Tiny and Paparazzi GPS units=== | ===Antenna options for the Tiny and Paparazzi GPS units=== | ||
| Line 302: | Line 329: | ||
=Tips= | =Tips= | ||
There is a huge amount of good information on the | There is a huge amount of good information on the Internet about GPS specifics that gives some good insight into GPS. This Paparazzi wiki is not intended to repeat already available information, some is added here. | ||
==EGNOS== | ==EGNOS== | ||
| Line 312: | Line 339: | ||
==DGPS (Differential GPS)== | ==DGPS (Differential GPS)== | ||
Differential GPS is any method of improving GPS accuracy by comparing the GPS-indicated position of a nearby location to the known value and transmitting any error to the mobile unit. DGPS was originally created as a means of bypassing the deliberately introduced inaccuracies in civilian GPS signals. The original method used low frequency ground radios to relay correction data to the mobile unit and is still used today at airports, shipping ports, and even individual farms. Satellite Based Augmentation System (SBAS) is a modern form of DGPS where the ground stations relay correction data to a GEO-Stationary satellite, which then relays it to the mobile unit on standard GPS frequencies eliminating the need for a separate radio | Differential GPS is any method of improving GPS accuracy by comparing the GPS-indicated position of a nearby location to the known value and transmitting any error to the mobile unit. DGPS was originally created as a means of bypassing the deliberately introduced inaccuracies in civilian GPS signals. The original method used low frequency ground radios to relay correction data to the mobile unit and is still used today at airports, shipping ports, and even individual farms. Satellite Based Augmentation System (SBAS) is a modern form of DGPS where the ground stations relay correction data to a GEO-Stationary satellite, which then relays it to the mobile unit on standard GPS frequencies eliminating the need for a separate radio receiver. SBAS is currently available in 3 regions, [http://www.esa.int/esaNA/ESAF530VMOC_egnos_1.html WAAS, EGNOS, and MSAS regions]. U-blox receivers support all common varieties of DGPS [http://www.u-blox.com/customersupport/gps.g3/ENGOS_Issues(GPS.G3-CS-04009).pdf read the u-blox SBAS application note]. | ||
* It is important to note that DGPS methods only improve the ''accuracy'' of the position calculation, not the ''precision''. Since Paparazzi navigation is typically performed relative to the power-on location, any static error that could be corrected with DGPS is irrelevant. | * It is important to note that DGPS methods only improve the ''accuracy'' of the position calculation, not the ''precision''. Since Paparazzi navigation is typically performed relative to the power-on location, any static error that could be corrected with DGPS is irrelevant. | ||
[[Category:Hardware]] [[Category:Sensors]] [[Category:User_Documentation]] | [[Category:Hardware]] [[Category:Sensors]] [[Category:User_Documentation]] | ||
Latest revision as of 09:29, 5 July 2020
GPS Receivers
An overview of GPS receivers used in combination with Paparazzi. The list is by far not complete. A lot more devices will work flawlessly with Paparazzi. If you have a GPS receiver you have used with Paparazzi that is not listed here, it would be great if you could add that information to this page.
1BitSquared G0 GPS

1BitSquared sells a Paparazzi UAV compatible GPS module called G0. It is designed to neatly fit on top of the Elle0 autopilot. It can also be used with any other Paparazzi UAV compatible hardware. G0 GPS module features a large ground plane with optional ground plane skirt, as well as RF shielding on the back of the module.
The large ground plane improves the directionality of the unit helping reject multi-path. When using the G0 GPS unit on a multi-copter it results in less drift when taking off the ground, and improves GPS lock when flying from waypoint to waypoint.
The EMI shielding on the back of the unit decreases the amount of noise injected from the aircraft avionics into the GPS unit, improving the noise to signal ratio. An increased signal results in a more robust satellite lock, and more reliable fully autonomous and guided flight operations.
G0 GPS module is using a U-Blox that is providing very fast speed updates that are crucial for accurate navigation within Paparazzi UAV. Additionally Paparazzi UAV supports the binary U-Blox protocol that is very efficient to parse compared to the very vaguely defined NMEA text protocol. Just enable the UCenter Module in your airframe file and Paparazzi will configure the module for best performance without the need for user interaction.
For more information go to the G0 GPS wiki page.
A very special receiver is the OpenSource (almost all...) Swiftnav Piksi GPS receiver. How to use this device with Paparazzi is described on the a specific page

LS20031 GPS Receiver

Sparkfun sells the LS20031 GPS module which uses NMEA (Paparazzi support for NMEA is BETA right now.) This Locosys GPS module supports WAAS (U.S. DGPS), EGNOS (EU DGPS), and MSAS (Japanese DGPS).
More information on configuring the GPS via PMTK can be found here
Globalsat BU 353

USB US Globalsat GPS-Mouse
Typical Uses:
- Parrot AR Drone 2.0
- Ground Station GPS (direct support with Linux / gpsd)
Not appropriate for many airborne applications due to extra USB-serial circuitry and weight of housing and internal magnet
Basic compatibility with Windows, Mac and Linux.
More information at the GPS/BU_353 site.
uBlox
![]() uBlox is a Swiss technology company that develops very good positioning modules. They are the recommended GPS modules for use with Paparazzi autopilots. Note that u-Blox produces the modules only. They do not sell complete boards to end users. These are sold by a multitude of vendors.
uBlox is a Swiss technology company that develops very good positioning modules. They are the recommended GPS modules for use with Paparazzi autopilots. Note that u-Blox produces the modules only. They do not sell complete boards to end users. These are sold by a multitude of vendors.
Why uBlox:
- Low cost (i.e. NEO6-M)
- Small size
- Excellent performance (u-Blox 7 and 8 series)
- Up to 10Hz update rate
- 5V tolerant UART
- Works out of the box with Paparazzi's u-Blox auto-configuration module
The Tiny series features an onboard LEA series GPS receiver and patch antenna, while most other boards boards require an external receiver+antenna such as the Paparazzi GPS or SAM-LS.


Note: The proprietary UBX protocol is used as it offers more information and efficiency than the universal NMEA protocol. For details take a look at the code in sw/airborne/subsystems/gps/gps_ubx.c.
u-Blox LEA Series Receivers

The Lisa series, TWOG, Classix and AVR-based boards require an external GPS module and antenna. The Tiny features an integrated receiver and antenna. Either type is designed for u-blox 4, 5 and 6 series GPS receivers and the proprietary UBX binary protocol. An external battery or capacitor is typically used to enable the GPS to retain data while powered off for significantly faster signal re-acquisition. Any of the LEA-4, LEA-5 and LEA-6 series receivers can be used including the less expensive LEA-4A, 4S, 5A and 5S and similar low cost 6-series models as the special boot configuration code required for these models is already written as a module.
  <!-- autobaud - runtime configuration of - ROM-only modules: use ucenter-module to configure your UBlox with no cable nor windows u-center -->
  <load name="gps_ubx_ucenter.xml" />
- 4Hz Position update rate
- Supports active or passive antennas
- Supports DGPS, WAAS, EGNOS, and MSAS
- Low position noise figure
Paparazzi Stand-alone uBlox GPS Receivers
Top
Bottom


Paparazzi source provides a design for an external GPS board. An external GPS board is required for other boards like Lisa, TWOG, Elle0 and Classix. Programming it is similar to the Tiny2.11 GPS configuration. If you build your own you will want to upload the latest u-blox firmware before you configure. See Get Hardware for sources of assembled boards.
The Paparazzi design in https://github.com/paparazzi/paparazzi-hardware/tree/master/sensors/gps/gps_13. The board is very small and light as it has only the components required. It is powered from the 5v line on the "downloads" connector of a TWOG. Also note it is a 4-layer PCB that means better noise resistance. The board has pins for USB connection but requires a different cable and a solder jumper to be move from the ground (default) to 3.3v input to enable the USB port on the module.
V1 BOM.xls
Eagle Parts List Output.txt
See Get Hardware page for suppliers.
Wiring Diagram


uBlox to ARdrone 2

To connect a uBlox with Helix antenna via a USB to serial cable that you can just plug into your ARdrone 2
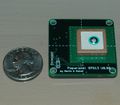
3rd Party u-blox Reference Design Boards

The only other GPS board in use seems to be u-blox reference designs or similar to it. They have LEA-4H, LEA-5H and LEA-6H (typically) and several interfaces. Often a larger antenna as well.
The board in the photo is a RF DESIGN LEA-5H-SMART.
The jumpers adjacent to the TTL interface connectors need to be closed with low value resistors for paparazzi uart port use. Also a battery has to be added with an appropriate charging resistor to enable RTC functionality.
NAVILOCK NL-507ETTL

The NAVILOCK NL-507TTL u-blox TTL Modul 60416 features an LEA-4 series receiver and 25mm patch antenna on a 30mm x 30mm board.
- Datasheet: http://www.navilock.de/download/Dokumente_SLASH_Sonstiges/60415_-_Datenblatt_u-blox_GPS_Module/481
- Purchase: Available for 28€ at www.amazon.de
SPK GS407

This is the model Sparkfun recommends as a replacement for the old GS406. It's essentially the same, but uses the newer 6-series receiver, and is not using a ribbon cable as an interface. It uses Sarantels SL1206 active antenna.
It's recommended to buy This extension cable to use with it.
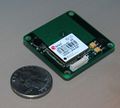
u-blox NEO-6M

This is the cheapest GPS module with antenna for ~13€ at Hobbyking.
They come with different (sized) patch antenna, mounted on a separate PCB. The main PCB and antenna PCB are fixed with hot glue together and can be separated by hand.
Nice module with u-blox 6 chip and without the annoying cable that the HK NEO-6m has. Navilock NL-652ETTL
u-Blox C04-6H Reference Design

u-Blox sells a complete module with antenna for around $200 and will also provide complete schematics, BOM, and PCB files for free if you wish to make your own. Two versions are offered, one with an 18mm patch antenna and the other with the Sarantel P2 helical antenna.
See http://www.ublox.com/en/evaluation-tools-a-software/reference-designs/for-gps-chips/c04-6h.html for more info.
Drotek Boards
Drotek's u-Blox GPS boards work well and are not expensive.
uBlox GPS configuration
Using uBlox U-Center
Note: Before attempting manual configuration consider adding the u-blox UCenter module to your airframe instead. If automatic configuration does not work for you please make an issue in he gitgub issue tracker or report it to the mailing list or the Gitter chat and may attempt the manual procedure below. But be aware that a wrong configuration can cause Paparazzi not acquiring any GPS lock for sometimes hard to find reasons.

U-Center is an application intended for the configuration of u-Blox receivers.
TIP: If you want to direct access to the GPS module without unplugging from your autopilot board you can upload the UART tunnel firmware to your AP board.
Installation on Linux
Using the latest u-Center v8.27 is needed if you want to setup the uBlox GNSS receivers of the 8 series and use all setting available. We could use u-Center perfectly with Ubuntu 16.04 and the latest version of Wine v2.0.2.
Cut and paste this one-liner in you terminal to install just that:
 sudo dpkg --add-architecture i386 && \
 sudo apt-add-repository 'https://dl.winehq.org/wine-builds/ubuntu/' && \
 wget https://dl.winehq.org/wine-builds/Release.key && \
 sudo apt-key add Release.key && \
 sudo apt update && \
 sudo apt install winehq-stable
 mkdir -p ~/.wine/dosdevices &&\
 ln -s /dev/ttyUSB0 ~/.wine/dosdevices/COM1 && \
 ln -s /dev/ttyUSB0 ~/.wine/dosdevices/com1 && \
 ln -s /dev/ttyUSB1 ~/.wine/dosdevices/COM2 && \
 ln -s /dev/ttyUSB1 ~/.wine/dosdevices/com2
NOTE
Depending on your connection method and your udev configuration your serial device may have a different path. Just look it up using dmesg or tail -f /var/log/syslog after plugging in.
Start U-center and choose your com port from the pull down list under the connect button near the top left corner of the window. Choose your baudrate from the pull down box to the right of the connect button or select the auto-baud button to the right of that. U-blox default is 9600 baud. This must be set to 57600 or higher to accommodate a 10Hz update rate. It needs to match whatever your module is configured with.

Uploading the Configuration File
Download the appropriate configuration file below and use u-center to load in onto your receiver. Under the Tools menu, choose GPS configuration. Be sure the box 'Store configuration into BBR/Flash' is checked and hit the button File>>GPS. A few errors and retries are normal, but a significant number of errors may indicate a poor connection and the software will notify you if it is unable to send all the data successfully.
- LEA-4P
- TIM-LL
- LEA-5H (For Use w/ Firmware V5 ONLY!)
- Hobbyking NEO-6M this module
- Drotek NEO-M8 at Baud 38400
Automatic Configuration at Startup
You can also use the u-blox UCenter module which will take over the task of initializing the GPS for you when you power your autopilot.
Manual Configuration
If you prefer to setup your receiver manually or have a model not listed above, here are instructions to configure your receiver in u-center. Open the message window (menu View->messages view) to start the configuration process by changing the following settings:
LEA-4P
- Right Click on the NMEA Icon and choose disable child
- Choose UBX->CFG->NAV2(Navigation 2) - set it to use Airborne 4G (tells the Kalman filter to expect significant changes in direction)
- UBX->CFG->PRT - set USART1 to 38400bps (must match the value in your Airframe file)
- Change the baudrate of U-Center to 38400bps if the connection is lost at this point
- UBX->CFG->RXM(Receiver Manager) - change GPS Mode to 3 - Auto (Enabling faster bootup only if signal levels are very good)
- UBX->CFG->RATE(Rates) - change the Measurement Period to 250ms (4 Hz position updates)
- UBX->CFG->SBAS : Disable (SBAS appears to cause occasional severe altitude calcuation errors)
- UBX->NAV (not UBX->CFG->NAV): double click on POSUTM, SOL, STATUS, SVINFO, VELNED. They should change from grey to black
- UBX->CFG->CFG : save current config, click "send" in the lower left corner to permanently save these settings to the receiver
LEA-5H
- Right Click on the NMEA Text on top of the tree and choose disable child messages
- Choose UBX->CFG->NAV5(Navigation 5) - set it to use Airborne 8 <4G. This tells the Kalman filter to expect significant changes in direction.
Note that this setting is only good for faster moving airplanes. For a fixed position hovering heli, 'pedestrian' setting is better
- UBX->CFG->PRT - set USART1 to 38400bps (must match the value in your Airframe file)
- Change the baudrate of U-Center to 38400bps if the connection is lost at this point
- UBX->CFG->RATE(Rates) - change the Measurement Period to 250ms This gives a 4 Hz position update since 4 x 250ms is one second.
- UBX->CFG->SBAS : Disable (SBAS appears to cause occasional severe altitude calculation errors)
- UBX->NAV (not UBX->CFG->NAV): double click on POSLLH, SOL, STATUS, SVINFO, VELNED. They should change from grey to black
- UBX->CFG->CFG : save current config, click "send" in the lower left corner to permanently save these settings to the receiver
- Cycle the power and verify that the new configuration was saved
- To reset the receiver to the factory defaults go to UBX->CFG->CFG, select 'Revert to default configuration', and click Send at the bottom left corner. To permanently save these values choose 'Save current configuration' and click Send.
- To backup the configuration to a file on your PC: under the tools menu, choose GPS configuration, then click GPS>>file. This file can be re-loaded in a similar manner to configure additional identical receivers. Be sure the box 'Store configuration into BBR/Flash' is checked when reloading a configuration file to make the changes permanent.
- To update the firmware on a LEA-5H get u-center >= 5.03, revert the GPS receiver to the default configuration, get an appropriate image from u-Blox (fitting your receivers serial number), find the flash identification flash.txt file in the u-center install directory and be prepared to wait a long time.
- NOTE: If you have a Tiny with LEA-5H module you must use u-center and manually setup the parameters as shown above (at least switch to 38400 baud manually before transferring the configuration file).
- NOTE: POSUTM is not available on LEA-5H. Instead, use POSLLH.
LEA-6H
We use the same configuration as for version 5
- Right Click on the NMEA Text on top of the tree and choose disable child messages
- Choose UBX->CFG->NAV5(Navigation 5) - set it to use Airborne 8 <4G. This tells the Kalman filter to expect significant changes in direction.
Note that this setting is only good for faster moving airplanes. For a fixed position hovering heli, 'pedestrian' setting is better
- UBX->CFG->PRT - set USART1 to 38400bps (must match the value in your Airframe file)
- Change the baudrate of U-Center to 38400bps if the connection is lost at this point
- UBX->CFG->RATE(Rates) - change the Measurement Period to 250ms This gives a 4 Hz position update since 4 x 250ms is one second.
- UBX->CFG->SBAS : Disable (SBAS appears to cause occasional severe altitude calculation errors)
- UBX->NAV (not UBX->CFG->NAV): double click on POSLLH, SOL, STATUS, SVINFO, VELNED. They should change from grey to black
- UBX->CFG->CFG : save current config, click "send" in the lower left corner to permanently save these settings to the receiver.
Make sure you activate "2 - I2C-EEPROM" if using a ROM-based NEO chipset with external EEPROM (like HK 31135)
- Cycle the power and verify that the new configuration was saved
- To reset the receiver to the factory defaults go to UBX->CFG->CFG, select 'Revert to default configuration', and click Send at the bottom left corner. To permanently save these values choose 'Save current configuration' and click Send.
- To backup the configuration to a file on your PC: under the tools menu, choose GPS configuration, then click GPS>>file. This file can be re-loaded in a similar manner to configure additional identical receivers. Be sure the box 'Store configuration into BBR/Flash' is checked when reloading a configuration file to make the changes permanent.
- To update the firmware on a LEA-6H get u-center >= 6.21, revert the GPS receiver to the default configuration, get an appropriate firmaware file from u-Blox, find the flash identification flash.txt file in the u-center install directory and be prepared to wait a long time.(seriously)
NEO-M8
- UBX - CFG - PRT: disable NMEA output (only UBX protocol)

- UBX - CFG - MSG: activate PVT, SOL, SVINFO messages for UART1

uBlox Tips
Reset to Default Settings
The GPS module can be reset to its original default settings by pulling BOOT_INT high(3.3V) during a power cycle (Antaris Manual, p. 122). It may be required after a wrong firmware upgrade or a bad configuration change.
Invalid argument
Problem: I keep getting this error with my nice shiny Tiny v2.1 with a LEA-5H: Invalid_argument ("Latlong.of_utm") Solution: Select the correct GPS subsystem.
WAAS issues
WAAS has been officially operational and "suitable for safety-of-life applications" since 2003. The default setting of all u-blox receivers ignores WAAS correction data and only uses the WAAS satellites for regular navigation like any other satellite. U-blox recommends further limiting this setting to exclude any stray EGNOS/MSAS satellites in North America, and completely disabling all SBAS functions for use outside North America. In 2006 one formerly reliable Paparazzi aircraft began having great GPS problems and displaying very erratic altitude calculations, disabling WAAS immediately resolved the issue and this phenomenon was recreated several times for verification. Turns out a new WAAS satellite was being added to the system and the others were being moved that week for better distribution. Our advice is to first test if SBAS works well in your region.
The default used by the u-blox UCenter module keeps SBAS enabled.
Assist Now
u-Blox modules that have a flash memory can keep the almanac correction data for up to 35 days into the future. That will give you a 3d GPS fix within seconds. AssitNow Offline data can be uploaded to the module while it is connected to the u-center application. To use this feature you need to provide a u-Blox account credentials that you can receive from the u-Blox registration site.
Antenna options for the Tiny and Paparazzi GPS units
See GPS/Antenna.
Tips
There is a huge amount of good information on the Internet about GPS specifics that gives some good insight into GPS. This Paparazzi wiki is not intended to repeat already available information, some is added here.
EGNOS
EGNOS augments the GPS satellite navigation system and makes it suitable for safety critical UAS applications. EGNOS became operational on 1 October 2009. ESA claims that it can determine position to within 2 meters compared with about 20 meters for GPS alone. Note that the service is currently provided only in western Europe. For further information take a look on the ESA EGNOS website.
For the latest update about functionality of EGNOS please check the website: European GNSS Supervisory Authority"
DGPS (Differential GPS)
Differential GPS is any method of improving GPS accuracy by comparing the GPS-indicated position of a nearby location to the known value and transmitting any error to the mobile unit. DGPS was originally created as a means of bypassing the deliberately introduced inaccuracies in civilian GPS signals. The original method used low frequency ground radios to relay correction data to the mobile unit and is still used today at airports, shipping ports, and even individual farms. Satellite Based Augmentation System (SBAS) is a modern form of DGPS where the ground stations relay correction data to a GEO-Stationary satellite, which then relays it to the mobile unit on standard GPS frequencies eliminating the need for a separate radio receiver. SBAS is currently available in 3 regions, WAAS, EGNOS, and MSAS regions. U-blox receivers support all common varieties of DGPS read the u-blox SBAS application note.
- It is important to note that DGPS methods only improve the accuracy of the position calculation, not the precision. Since Paparazzi navigation is typically performed relative to the power-on location, any static error that could be corrected with DGPS is irrelevant.